Thursday, March 12, 2015

Travelling With Cloth Diapers?

Anyone who knows me knows that I am cloth diaper obsessed, specifically AppleCheeks cloth diapers. Cloth diapering is NOT what it used to be in our Mother's and Grandmother's time. Cloth diapering has come a looong way and has become a huge movement for reasons that are easy to understand; they are cost effective, environmentally friendly, very fashion forward, and highly collectible, and believe it or not cloth diapers actually have re-sale value - can you say any of that about disposables?


This post is not to sell you on cloth, because frankly I think they sell themselves, but to share with you my experience of taking our beloved AppleCheeks with us on vacation.

I will admit to you that before I faced my fear of travelling with our cloth diapers, I always used disposables for travel. My fear was lugging around a bag of poopy cloth in our car, or carry-on bag, or diaper bag. I used to think it was just easier to pack a few disposables and throw them away so I didn't have to deal with carrying the mess around. BUT then we were experiencing blow-out after blow-out in disposables, and well, I ended up having to pack extra sets of clothing, and carry around the poopy clothes anyway - which was more cumbersome than a couple of dirty diapers.

So I took the leap and decided to pack up our diapers for a recent trip to the Caribbean. 

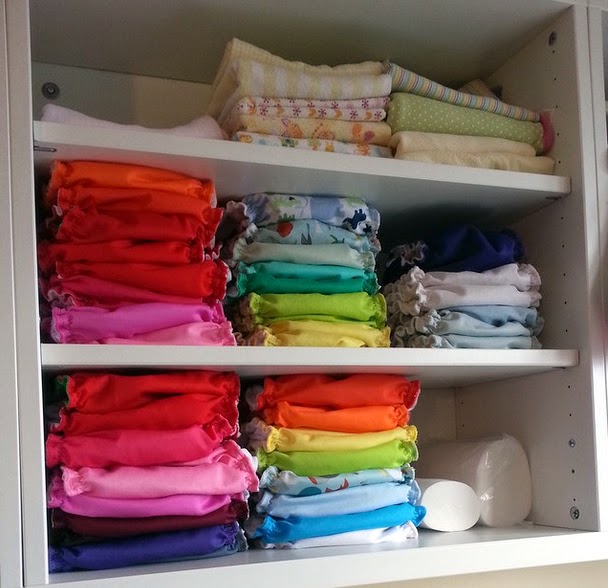
I Packed 15 covers in one wet bag, and 15 inserts in another wet bag. I had 2 in our diaper bag and left with 1 on our girls' bottom.
I also brought 1 large wet bag along to catch the dirty diapers at our destination as needed. 


18 diapers in total considering 1 wash cycle got us through the week with ease. As long as I have access to a washing machine were I'm headed, cloth diapering is a no-brainer now. It so so easy. 


And I don't mind saying that I think she was the cutest baby on the beach. That cute little number is called Appletini by AppleCheeks cloth diapers; she had her cocktail, and I had mine ;)


If I wasn't sold on the whole thing after going through the week with such ease, I was certainly sold after a question from another mom on the flight home. She asked, "how on earth did you find everything for your baby on the island? did you have trouble?".  My response? "I breastfeed and cloth diaper, I didn't need a thing!"

Want to try out AppleCheeks cloth diapers???
Follow us on Instagram for your chance to win 1 of 2 Little Bamboo Bundles from the AppleCheeks Easter release: First Crush and Crazy Love


Wednesday, March 11, 2015

Old Bench Turned Retro Kitchy Play Kitchen

DIY Retro Play Kitchen!

When our then almost 2 year old kept mimicking what I did in the kitchen by bringing us, and anyone who stepped foot in our house, make-shift tea and cookies (usually duplo blocks on a tiny tea set my Aunt gave her) we thought a play kitchen would be the perfect gift for her 2nd birthday. 

So we began looking at what was out there, and we were shocked by how expensive and low quality everything was. Such as these examples from Toys R Us, like this Plastic Palace for $350.00!

Or this low end one still expensive as heck for $120.00!
And let me tell you these picture make them look amazing! In store they look cheaper than cheap. AND have you ever seen these things after they've been played with? Marker and dirt that never seems to wash off of that cheap molded plastic, broken knobs, sun-bleached plastic, peeled off stickers... ugh I hate those things.. and honestly, if they actually cost what they are worth, then maybe I'd have considered getting one for our E. 

So of course hubby and I figured out how to make it ourselves. 
We had an old shoe bench we weren't using anymore and we did THIS with it.


I cannot begin to tell you how fun this was!

Not only does our daughter love it, it was super cheap to make, and it's so so cute!


I made her some play eggs from old plastic Easter eggs, felt, and an old egg carton


And these spice jars. I purchased a pack of six empty jars from the dollar store for $2, raided my spice cupboard, and whipped up these labels on the computer


I made the apron from fabric scraps and a vintage pattern I had, and the oven mitts from this free pattern from ikatbag.com. Here is a great free pattern from AestheticNest.com for an apron.
We grabbed a cheap piece of plywood for the back, and cut a hole in the top of the bench for the sink. The sink is a stainless steal mixing bowl that we had in the cupboard, that I think was originally purchased from the dollar store. 
The tiles, faucet, door pulls, shelf, towel rack and hinges we picked up from the Habitat for Humanity Restore for less than $20. Most of the bits and bobs we got from a jobber store called Active Surplus. We got really creative, like the stove elements are old computer tower fan covers, and the knobs on the oven are old UHF TV channel turners; these items we literally picked up for pennies. 
The wallpaper is vinyl tablecloth material that I picked up for $5 at a local fabric shop. 
The paint was probably the most expensive part coming in at $25 because I had my heart set on these vintage Tomato and Seafoam colours to compliment the theme, but you could absolutely use old paint you have lying around for free, or check out the mistake colours at your local paint store for a discounted price.
The rest of the accessories I picked up at the dollar store. Yes, I found measuring cups, tongs, a whisk, sponges, plaid washcloths to compliment my colour scheme, a mini frying pan, a mini pot, and a spatula all for $1 each! The teaset we already had (it's what started it all - from the Aunt :) )
The small appliances you see where purchased to go along with the kitchen for our daughter's birthday, and just happened to match our design.  
So I would estimate that when all was said and done, this beautiful, custom made, retro play kitchen cost us only about $75 to make, and lots of love :)
Now this is something we will have for years to come, and it's built to last. We are planning a few upgrades already, such as working lights for the fridge and oven!


If you're looking for a fantastically fun to make gift for a little on in your life, I can guarantee this will impress on a budget.